Offset Bending Multipliers
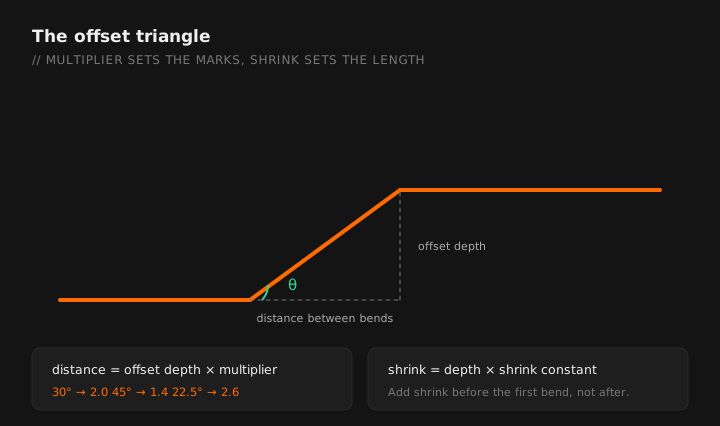
An offset bend consists of two equal bends in opposite directions to move the conduit around an obstacle. The multiplier tells you the distance between bend marks based on your offset depth and bend angle. The shrink constant tells you how much shorter the conduit becomes because of the bends — you need to add this to your overall measurement.
| Bend Angle | Multiplier | Shrink per Inch of Offset |
|---|---|---|
| 10° | 6.0 | 1/16" |
| 22.5° | 2.6 | 3/16" |
| 30° | 2.0 | 1/4" |
| 45° | 1.414 | 3/8" |
| 60° | 1.155 | 1/2" |
Example: You need a 4-inch offset using 30° bends. Distance between marks = 4 × 2.0 = 8 inches. Shrink = 4 × 1/4" = 1 inch. Add 1 inch to your starting measurement to compensate.
Pro tip: 30° bends at a 2.0 multiplier are the most commonly used offset angle because the math is simple and the bends look clean. Use 45° when space is tight and you need a sharper offset.
The app's bending calculator works in sixteenths, because that is what your tape reads.
90-Degree Stub-Ups
A stub-up is the most basic bend. You're bending the conduit 90° to go from horizontal to vertical (or vice versa). The key measurement is the take-up — how much of the conduit the bender "uses" to create the bend.
| EMT Size | Take-Up | Deduct |
|---|---|---|
| 1/2" | 5" | 5" |
| 3/4" | 6" | 6" |
| 1" | 8" | 8" |
| 1-1/4" | 11" | 11" |
How to use it: If you need a 12-inch stub using 1/2" EMT, mark the conduit at 12" - 5" = 7 inches from the end. Place the bender arrow on that mark and bend to 90°.
Three-Point Saddle Bends
A saddle bend goes over an obstacle (like another pipe) and comes back to the original plane. It uses three bends: a center bend and two equal outer bends.
Standard Method: 45° Center, 22.5° Outers
- Mark the center of the obstacle on the conduit
- Measure the depth of the saddle (how high the obstacle is)
- Multiply the depth by 2.6 to get the distance from center mark to each outer mark
- Bend the center mark to 45°
- Flip the conduit and bend each outer mark to 22.5°
- Shrink: multiply depth by 3/16" per inch
Alternative: 60° Center, 30° Outers
- Distance from center to outers: depth × 2.0
- Center bend: 60°
- Outer bends: 30° each
- Shrink: multiply depth by 1/4" per inch
Pro tip: For small obstacles (under 2 inches), use the 45°/22.5° method. For larger obstacles, the 60°/30° method gives you a tighter saddle that looks more professional.
Back-to-Back 90s
Back-to-back bends create a U-shape. Measure the distance between the two legs (outside to outside), subtract the gain for your conduit size, mark the conduit, and bend.
| EMT Size | Gain (per 90° bend) |
|---|---|
| 1/2" | 3" |
| 3/4" | 3-3/4" |
| 1" | 4-1/2" |
| 1-1/4" | 5-3/4" |
Kicks (Partial 90s)
A kick is a single bend less than 90° used to angle conduit into a box or transition between surfaces. The approach is similar to a stub-up but you're bending to a smaller angle. Use the travel and setback method or simply eyeball it for small kicks (10-15°) — experienced electricians often do this by feel for minor adjustments.
Key Rules to Remember
- Never exceed 360° of total bends between pull points (NEC requirement)
- Always account for shrink on offsets and saddles — it's the most common mistake
- Mark your conduit with a pencil, not a marker — marker lines are hard to see under jobsite lighting
- The arrow on the bender marks different things depending on the bend type — check your bender's instructions
- Anti-dog (aligning multiple conduit runs) requires consistent technique — bend one stick, use it as a template for the rest
Pricing the job as well as bending it? Tradesman Office builds estimating and labor-rate tools for contractors that pair well with a cheat sheet like this one.
Offsets, saddles, kicks and stubs in fractional inches. Free tier, works offline.
GET THE FIELD PACK
Two printables: the 22-point rough-in checklist, and branded panel schedules in 24, 30 and 42 circuit that print at 4 by 5 inches and slide straight into a panel sleeve. Enter your email and the downloads open right away.
You're set. Both are below.
Your address comes straight to Jason. No list rental, no spam, unsubscribe any time.