Loose terminations are one of the leading causes of electrical fires, and overtightened terminations are one of the leading causes of damaged conductors. The code's answer to both is short, and it changed the tools you are required to own.
What the rule actually says
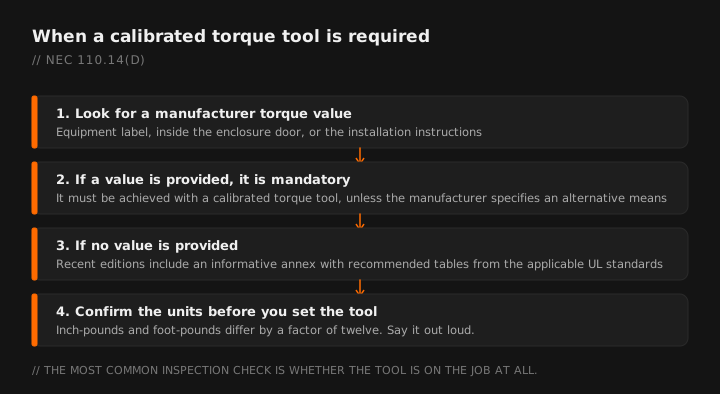
Read it twice, because the compliance burden is in the middle of the sentence. The requirement is not "tighten it correctly." It is "achieve the specified value with a calibrated tool."
This language was added in the 2017 edition and tightened in 2020 to specifically require a calibrated torque tool. Since essentially all modern equipment carries torque markings, in practice this means a torque screwdriver and a torque wrench are now required tools for terminations, not optional ones.
Where the number comes from
In order of priority:
- The equipment label. Panelboards, disconnects, meter sockets and load centers almost always carry torque values printed on the label inside the door or adjacent to the lugs. Look there first.
- The installation instructions. Devices, connectors and terminal blocks that are too small to label carry values in the packaging instructions. Those instructions are enforceable under the general requirement to install listed equipment in accordance with its listing.
- Informative Annex I. Recent NEC editions include an informative annex reproducing recommended tightening torque tables from the applicable UL standards, for use where the manufacturer has not provided a value. It is informative rather than mandatory, but it is the accepted fallback and it is right there in the back of the book.
The app carries wire and bolt torque references so you are not hunting a label in a dark panel.
If the manufacturer provides a value, use that value. The annex tables are for the gap case, not a substitute for the label in front of you. A manufacturer's specification always wins over a generic table.
Typical ranges, so you know when something is wrong
These are orders of magnitude, not specifications. Use them to catch a misread label, never as your torque value.
| Termination | Typical order of magnitude | Tool |
|---|---|---|
| Device terminal screws (receptacles, switches) | Low tens of inch-pounds | Torque screwdriver |
| Small breaker lugs, 14 to 10 AWG | Roughly 20 to 40 inch-pounds | Torque screwdriver |
| Mid-size lugs, 8 to 4 AWG | Roughly 40 to 120 inch-pounds | Torque screwdriver or wrench |
| Large feeder and service lugs | Hundreds of inch-pounds, often stated in foot-pounds | Torque wrench |
| Structural and equipment bolting | Foot-pounds, per the equipment or structural spec | Torque wrench |
Note the units. Inch-pounds and foot-pounds differ by a factor of twelve, and mixing them up is how a device screw gets sheared off or a service lug gets left finger-tight. A label reading 45 in-lb and a wrench set to 45 ft-lb are not the same instruction.
The tools you actually need
- A torque screwdriver covering roughly 10 to 100 inch-pounds. This covers devices, small breakers and most control terminations. It is the tool that gets used daily.
- A torque wrench covering the range your service work lands in, usually into the hundreds of inch-pounds or low foot-pounds.
- A calibration record. "Calibrated" implies it can be shown to be calibrated. Manufacturers publish recalibration intervals, commonly annual or by cycle count. Keep the certificate.
Click-type tools need to be relaxed. Storing a click-type torque tool at its highest setting keeps the spring compressed and drifts the calibration. Back it off to the low end of its range before it goes in the bag. This is the most common way electricians ruin a tool that is technically still in its calibration window.
What inspectors are actually checking
The realistic version, from the field:
- Do you own the tool? The most common check by a wide margin is whether a calibrated torque tool is present on the job. Not having one is the citation.
- Spot checks on accessible terminations. Some inspectors will re-torque a lug or two. A properly torqued connection will move slightly before the tool clicks, which is normal and not evidence of a loose connection.
- Torque logs on larger services. Increasingly common on commercial and industrial work, sometimes required by specification rather than by code.
- Aluminum terminations get extra attention, because aluminum's creep behavior makes correct torque more consequential than it is on copper.
Aluminum conductors deserve a paragraph
Aluminum deforms under sustained pressure more than copper does. An aluminum termination that is undertightened will loosen further over thermal cycles, and one that is overtightened can be permanently deformed at installation. This is why aluminum terminations specify torque more insistently and why an antioxidant compound is commonly specified alongside.
Use the connector's own instructions. Terminating aluminum into a lug not listed for aluminum is a separate and more serious problem than torque.
Practical field method
- Find the value before you strip anything. Read the label with the panel open and the lights on, not upside down in a crawl space.
- Confirm the units. Inch-pounds or foot-pounds. Say it out loud.
- Set the tool and verify the setting. Dial tools drift when they are dropped.
- Torque in a sensible order on multi-lug equipment, so that seating one lug does not disturb the last.
- Mark what you have done. A paint pen mark across the lug and the body is the standard practice, and it lets anybody including you confirm at a glance whether that connection has been torqued.
- Log it on anything substantial. Service and feeder terminations, at minimum. It takes two minutes and it is the difference between an argument and a record.
Why this became a rule
Loose terminations do not fail immediately. They heat, oxidize, heat more, and fail months or years later, often as a fire in a wall with nobody around to see how it started. Torque specification is one of the few requirements in the code aimed squarely at a failure mode that shows up long after the inspection passed.
It also shows up on the common violations list and belongs on your rough-in walkthrough, particularly at the panel where every conductor in the building terminates.
Wire and bolt torque references, offline and field-ready. Free tier.
GET THE FIELD PACK
Two printables: the 22-point rough-in checklist, and branded panel schedules in 24, 30 and 42 circuit that print at 4 by 5 inches and slide straight into a panel sleeve. Enter your email and the downloads open right away.
You're set. Both are below.
Your address comes straight to Jason. No list rental, no spam, unsubscribe any time.