A failed rough-in almost never costs you the correction. It costs you the trip back, the re-inspection fee, and a general contractor rescheduling insulation and drywall around you. That is the real number, and it is usually several hundred dollars for something that took four minutes to fix while you were standing there.
Everything in this list is something an inspector can see and you can see. Walk it before you call it in.
Boxes and enclosures
1. Box fill calculated, not guessed. Count conductors, add two for each device yoke, one for all clamps together, one for all grounds together. Compare to the cubic inches marked on the box. This is the calculation people skip and inspectors check. See the box fill guide if the counting rules are fuzzy.
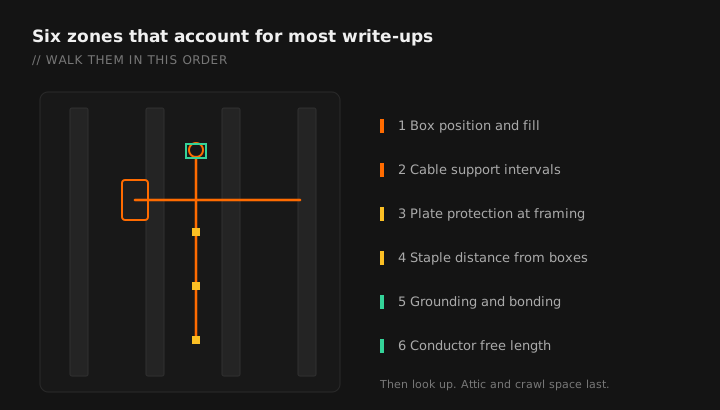
2. Boxes set flush or within tolerance. In a combustible wall surface the box front must be flush with the finished surface. In non-combustible surfaces it may be set back, but not more than the permitted amount. Ask what wall finish is going on before you set depth.
3. Boxes securely fastened and independently supported. Not hanging on the cable. Not relying on the drywall. Not one nail.
4. Old work boxes only where legal. Cut-in boxes in new construction, where framing is available, tend to draw a comment.
5. Unused openings closed. Knockouts that got popped and abandoned need a listed closure plate. This is free to fix now and irritating to fix later.
Conductors
6. Free conductor length at every box. The code requires a minimum free length measured from where the conductor emerges from the cable sheath or raceway, plus enough to extend outside the box opening. Leave more than the minimum. Nobody has ever failed for leaving too much, and the next person to work on it will thank you.
Photograph each rough-in and SparkCheck flags likely issues with severity and a suggested fix.
7. Sheath extends into the box. The cable jacket has to enter the box and be visible past the clamp. Stripping the sheath outside the box is one of the most common write-ups on residential work.
8. Conductors identified correctly. White for grounded, green or bare for grounding, and any re-identification done properly and permanently. A white conductor used as an ungrounded conductor in a cable assembly must be re-identified at every visible point.
9. No damaged insulation. Nicks from staples, scrapes from studs, and cuts from a drywall screw that missed. Look at the cable, not just the terminations.
Support and protection
10. Cable secured within the required distance of every box. There is a maximum distance from the box to the first support, and a maximum interval between supports after that. This is checked visually on nearly every inspection.
11. Staples driven correctly. Flat against the cable, not crushing it, not sideways, not through it. A crushed cable under a staple is a damaged conductor.
12. Plate protection where the cable is close to a framing edge. Where a bored hole is closer than the required distance to the nearest edge of a stud or joist, a steel plate goes on. This is the most common rough-in failure in the trade, and it is entirely preventable.
13. Cables through metal framing protected by grommets. Listed bushings or grommets in every metal stud penetration, in place and not fallen out.
14. Running boards or protection in attics and crawl spaces. Cables run across the top of joists in accessible attic areas need protection under the rules for that space.
15. Raceway supported per its own rules. EMT, PVC and flexible raceways each have their own maximum support intervals and distance-to-box requirements. They are not the same.
Grounding and bonding
16. Equipment grounding conductor present and continuous. Every box, every device, no exceptions in modern construction.
17. Grounds pigtailed where required. The grounding path cannot depend on the device remaining in place. A ground that is broken when you pull a receptacle out is not a continuous path.
18. Metal boxes bonded. Grounding conductor terminated to the box with a listed means, not wrapped around a screw that happened to be there.
19. Grounding electrode system roughed and accessible. Rods driven, concrete-encased electrode stubbed and tagged, water pipe bond planned. See GEC sizing for the conductor side.
Layout and protection devices
20. GFCI and AFCI locations correct for your adopted edition. This is where editions bite hardest, because the required locations have expanded in every recent cycle. Confirm which edition your jurisdiction enforces and check the layout against that one, not the one you learned. See GFCI vs AFCI.
21. Receptacle spacing meets the wall rule. No point along a wall line farther than the required distance from a receptacle, with the countertop and island rules applied separately in kitchens. Walk it with a tape, not with your eye.
22. Panel schedule started and circuits identified. Legible, accurate, and describing the load rather than the room where you happened to be standing. Some jurisdictions want this at rough, some at final. Doing it now costs nothing and prevents guessing later.
The order to walk it
Do not walk this list top to bottom in the field. Walk it by location, which is how the inspector will move:
- Panel first. Grounding, bonding, conductor identification, schedule, free length.
- Then follow each homerun. Support intervals, plate protection, staple condition, bored hole placement.
- Then every box in sequence. Fill, depth, sheath entry, free length, ground termination.
- Then the layout. Tape measure on receptacle spacing, then verify the protection scheme room by room.
- Then look up. Attic, crawl space, and anywhere cable crosses framing above head height.
Things worth photographing before drywall
Not for the inspector. For you, six months from now, when somebody asks what is behind the wall.
- Every wall with a homerun in it, with a tape or a stud visible for scale.
- The panel with the door off and the schedule visible.
- Any unusual routing, junction, or piece of protection you had to improvise.
- The grounding electrode connections before they are covered.
This habit has saved me more billable hours than any tool I own. It also gives you something concrete to show a customer who is questioning what they paid for.
If you do fail
Fix the cited items, and while you are there, fix the ones the inspector did not cite. Inspectors frequently stop writing after they have found enough to fail you. The uncited version of the same problem is still in the wall four studs down, and the re-inspection is when it gets found.
Most of what shows up here also appears on the most commonly cited violations list, which is not a coincidence. The same handful of items account for the large majority of write-ups nationwide.
SparkCheck reviews photos of your rough-in and flags what an inspector is likely to write up.
GET THE FIELD PACK
Two printables: the 22-point rough-in checklist, and branded panel schedules in 24, 30 and 42 circuit that print at 4 by 5 inches and slide straight into a panel sleeve. Enter your email and the downloads open right away.
You're set. Both are below.
Your address comes straight to Jason. No list rental, no spam, unsubscribe any time.